About The Designer
Hello, my name is Samantha. I am 31, I am an army wife , A DRILL SERGEANTS WIFE. I have survived 3 deployments and endless field training. Rick and I have been married for 13 years in August. I am a stay at home Mom of 3. Richard is 11, Christianna is 9 and Diana is 4. I am an avid photographer. I have many hobbies as well as photography. I like to read, write, make scrap Kits, posers, write tutorials, I have been creating tags since 2003. I am currently attending school for Digital Photography and Media Arts.
I love creating.. Please come back and visit often..


I love creating.. Please come back and visit often..
Social Butterfly
So Rick tells me all the time that I am a social butterfly. So I thought I might as well add these to my blogs as well..


Showing posts with label Bits N Bobs. Show all posts
Showing posts with label Bits N Bobs. Show all posts
Tuesday, October 6, 2009
Angel
 7:22 PM |
 Posted by
Sami

Scrap Kit by Bits N Bobs, you can purchase the scrap kit here
Tube by Ismael Rac Purchase his work and a license to use @ Artistic Minds
Mask 404 By Vixx You can dowload them from here.. Remember if you download anything
from her site leave her lots of love..

open frame 3 copy and paste as new layer
resize by 80%
open tube of choice copy and paste as new layer
resize by 80%
Move tube behind your frame layer
Open your paper of choice
i am using paper 1
Copy and paste as new layer
Moving below all other layers
Go to Layers load/save mask image
Open your mask of choice and merge group
Open flower 3
copy and paste as new layer
resize by 75%
Move above all layers
Duplicate 4 time and place along the bottom of your frame
open string 4 copy and paste as new layer
Move between your frame and tube layers
Open doodle 4
copy and paste as new layer
resize by 70 %
Duplicate and mirror
Merge down
Add drop shadow of choice
Add your copyright, name and save
Tube by Ismael Rac Purchase his work and a license to use @ Artistic Minds
Mask 404 By Vixx You can dowload them from here.. Remember if you download anything
from her site leave her lots of love..

This tut is written by Me on 6October 2009. Any similarities to this is completely coinicidental
Open new raster layer
600x600 flood fill white open frame 3 copy and paste as new layer
resize by 80%
open tube of choice copy and paste as new layer
resize by 80%
Move tube behind your frame layer
Open your paper of choice
i am using paper 1
Copy and paste as new layer
Moving below all other layers
Go to Layers load/save mask image
Open your mask of choice and merge group
Open flower 3
copy and paste as new layer
resize by 75%
Move above all layers
Duplicate 4 time and place along the bottom of your frame
open string 4 copy and paste as new layer
Move between your frame and tube layers
Open doodle 4
copy and paste as new layer
resize by 70 %
Duplicate and mirror
Merge down
Add drop shadow of choice
Add your copyright, name and save
I would love to see your results..
Please send your results to
Scrapsbysamantha@gmail.com
 Labels:

Sunday, August 30, 2009
Spring Fever
A new tut Featuring the work of Elias Chatzoudis
and a fabulous kit by Bits N Bobs

This tut was written by Me on 22August2009
Any resemblance to any other tutorial is strictly coincidental.
Lets Begin
Supplies Needed
PSPx2 ( any version will work)
Scrap of Choice I am using Water-Melon by Bits N Bobs You can Purchase her scraps here
Tube of Choice I am using the artwork of Elias Chatzoudis. You can Purchase here. Do Not use if you do not have a proper License to do so.
Mask of choice.. I am using WSL_Mask226 by Weescotslass
Font of choice I am using Arctic
Open new layer 700x700 (rename Background)
We will resize this later
Flood Fill white
Open up Frame-11 from your kit
Copy and paste as new layer
Duplicate frame we will use it alittle later
Open your tube and copy as a new layer
Paste on your frame move under the duplicated frame
Grab your eraser tool and erase the top parts of the duplicated frame
We want her arms and head over the frame
Now open up your paper of choice
I am using paper-8
Copy and paste as new layer
Move it right above your background layer
Highlight your bottom frame and grab your magic wand
Click inside the frame, when you see your marching ants
Go to Selections modify and expand by 8
Hightlight your paper layer
Go to Selection and invert and hit the delete key
open some leaves I am using ivy 3
Copy and paste as new layer
Move above your background layer
See mine for placement
Open up flowers-10
copy and paste as new layer
Move above all other layer and place to the right of your frame
See mine for placement
Open up paper-3
with your background layer highlighted
Copy and paste paper as a new later
Open up your mask
SOuce Lumiance check and invert transperacy uncheck
Apply Mask and merge group
add drop shadow of choice to mask layer
Go to image
Resize ( make sure resize all layers is checked)
Resize by 80%
i have decided to drop the white background.
you can leave it if you wish
Add copyright information
Name and Save..
Don't forget to send me your results I would love to see them:)
Divalicious
New Divalicious Tutorial
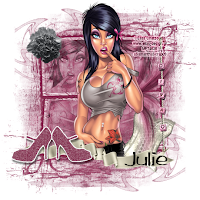
Supplies Needed
Divalicious PTU Kit by Bits N Bobs. You can grab this wonderful kit here
Tube of Choice I am using the art work of Elias Chatzoudis.
Do not use unless you have a proper license which you can get here
Mask of choice, I am using Mask 221 by Weescotslass Creations
Fonts of Choice
PSPX2 any version will work
Creaste New Raster Layer 600x600
flood Fill White
Open your frame I am using Frame4
Copy and paste as new layer
Resize by 50%
Open your Tube of Choice
Copy and paste as new layer
Move below your frame right side
Grab your magic wand
select inside the 2 frames in the right
go to selections, modify and expand by 6
Hightlight your tube layer
Selections, Invert and hit the delete key
Take your layer settings to Luminace
Transpercy down to 50%
Duplicate tube layer and mirror image
Go back to your tube layer and
copy and paste as a new layer
Resize by 90& and move above the frame layer
and place in the center
Open up your paper of choice
I am using paper 1
Go to layer, load/save mask, load mask from disk
I am using Mask221
Merge group
Open up your String Beads
I am using String 2
Copy and paste as new layer
move to the right
resize by 40%
Move to the right
See mine for placement
Open up ribbon 2
copy and paste as new layer
Move above your tube layer
Resize the ribbon by 50%
move to the bottom ( see mine for placement)
Highlight your tube layer
grab your eraser tool
with these settings
Size 16 harness 100 step 1 density 100 thickness
100 rotation 0 Opacity 100
Erase the little bit of the tube that is below the ribbon
Be careful not to erase to much.
Open up your flower of choice
I am using Flower 4
Copy and paste as new layer
Resize by 40%
Move to the top left
Resize again by 90%
Open up corset 2
copy and paste as new layer
Resize by 60%
Free Rotate to the right 25 degrees
move to the right
See mine for placement
open up fancy feather 3
copy and paste as new layer
Mirror and move the the right
under your tube
Open up shoe 6
copy and paste as new later
resize by 40 %
move to the bottom left
duplicate and mirror
Move duplicated layer to the left
Add your gradient glow to the shoes
and drop shadow of choice
Add your copy right
Name and save
Don't forget to send your results to scrapsbysamantha@gmail.com
Subscribe to:
Posts (Atom)


My Blinkies


Hang Outs

Promoting At


My Favorite Reads


Lorem Ipsum
Background Layout and Header made by me Samantha.
Scrap kit used for the layout is Amour by Addictive Pleasures.
Tube for header by Ismael Rac Scrap Used is Amour
Scrap kit used for the layout is Amour by Addictive Pleasures.
Tube for header by Ismael Rac Scrap Used is Amour